Wednesday, August 29, 2012

Comfort Food Redefined

I recently lost a dear relative with whom I was very close. Unfortunately, I was at school away from my family when I heard the news. That day, last Friday, was unbearable. I had the support of my friends who knew of my family's loss, but I really just wanted to be at home with my mom. That was not possible until the next day, so one of my wonderful friends devised a plan to brighten the day even a little.
I went to his apartment for a hug, and instead (or in addition, really), he took me to the grocery store and told me to get anything I wanted. While my reluctance to spend his money on myself was evident, I have to admit it didn't take long for me to get into the groove, grabbing ingredients from every aisle.
Twenty-five minutes and several weekly allowances later, we were ready to head back to the kitchen, as I was going to make my version of comfort food.
The plan: Thyme pasta and sugar snap peas, the former being my favorite pasta, the latter a form of homesickness, as one of my mom's specialties is sugar snap peas.


RECIPE: (serves 3, or 2 with leftovers!)
1/2 box pasta of your choice. I used Farfalle.
1 medium yellow onion, diced
10-15 sprigs of fresh thyme
3 T olive oil
3 t rock salt
4 t ground pepper
4 cloves of garlic, minced
1 1/2 c sugar snap peas
3 T reduced balsamic ("Balsamic Glaze" in stores)

Remove the thyme leaves from the stalks by gently pinching the top of the stalk and gliding it down, against the natural growth of the leaves. Chop the leaves finely.


Heat 1 T olive oil in a medium nonstick pan at medium heat. Add onion, 1 t salt, 2 t pepper, and garlic and raise the heat to a medium-high level. Cook at medium heat, stirring occasionally.
Boil water in a large pot for the pasta. When steam rises from the water, add 1 t salt and a splash of olive oil.
When the onions begin to look translucent, add the chopped thyme. Continue to stir occasionally, and change the heat to low. They can remain like this until serving time.
In a medium pan, heat 1 T olive oil at medium heat. Add the sugar snap peas and stir until they are fully coated in the oil. Add 1 t salt, 2 t pepper, and around 1 T of the balsamic and stir. Continue to stir often, adding balsamic as you go.


When the water is boiling, add the pasta and cook to your liking and according to the directions on the box. I prefer my pasta al dente (firmer), so I always take off a couple minutes from the directions.
Continue to cook the sugar snap peas until they begin to brown. Switch the heat to low. The peas can remain like this until serving time.
When the pasta is ready, strain it and add it back to the pot with 1 T olive oil and stir. Add in the onion mixture.
Serve and feel comforted--I know I did!

In Loving Memory
Grandmommy Anne


Until your time again finds mine, 
Julia

Sunday, August 19, 2012

"Pot Luck"

My grandfather turned the big eight-oh this summer! I'm pretty obsessed with my grandfather, so this event in itself was a pretty big deal to me, but what was even more great was that my grandmother decided to hold a huge party/family gathering in his honor. Second to my grandfather, I'm obsessed with my whole family. I need to see everyone as often as possible, and I experience concerning withdrawals when I leave them for school or vacation.
I consider my family (my mom's side) to consist of about 50 people. I don't have any cousins, but I have plenty of those second, third, twice removed mumbo jumbo and we all interact as though we are directly related. Everyone is either my aunt, uncle, or cousin. I even have a great aunt that I, along with everyone else in the entire family, call "Grandmommy." So yeah, we're tight.
Anyway, this party had me super excited because EVERYONE was coming, and since we all live in different places around the country, it's not very often that we're all together again.
The family had the whole week together, and then the party was on Saturday. My grandmother worked really really hard on everything for this party, and one of her fantastic ideas to lessen her terribly heavy load was to ask each person to bring their favorite salad, dip, or finger food. I WAS PSYCHED. A chance to mess around in the kitchen?!?!?! Yes, please!


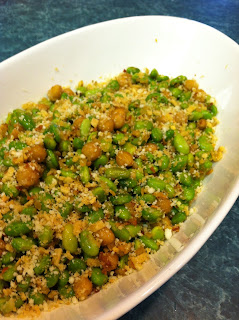
Though I definitely had Pinterest recipes on the brain, I was basically making this up as I went along. And I can promise you you can too. You need a flavor theme (sweet, salty, savory...) and something crunchy and crushable (breadcrumbs, corn flakes, potato sticks...). But a lot of people hate that kind of direction, so yayyy I made a non-ambiguous recipe.

RECIPE:
1 strained can of chickpeas
1 thawed bag of frozen, shelled edamame
Mixture of:
     3 T crushed/ground potato sticks
     2 t garlic chips
     2 T powdered Parmesan cheese
     1 t kosher salt
     1 t coarsely ground pepper
     1/2 to 1 1/2 t chili flakes
2 T olive oil
2 t sesame oil


*Prepare the chickpeas and edamame separately.
Preheat your oven to 400. 
Toss chickpeas in half of the olive oil (1 T) and half of the sesame oil (1 t). It doesn't need to be exact. 
Toss the edamame in the rest of the olive oil and sesame oil. 
Spread the edamame and chickpeas on 2 separate cookie sheets large enough to make one layer. 
Sprinkle enough of the dry mixture over the edamame & chickpeas to thinly coat them. Using a spoon, "stir" (really just shift/roll them around so that they pick up the excess dry mixture and their un-sprinkled sides become exposed) the edamame and chickpeas, making sure they remain in one layer (no piles or mounds). Continue to sprinkle and "stir" until they are completely covered (as if they are being battered for a fry). If there is excess, you can save it and sprinkle it on top at the end as a garnish, but don't feel left out if there isn't any. I'm just trying to make the stingy people feel better. 
Place the cookie sheets in the oven. The chickpeas will take between 10 and 15 minutes to get crispy. The edamame will take 30 to 40 minutes. 
When both are crispy, remove and let cool (still on the cookie sheets). 
Combine in a large bowl & mix gently.


This dish can be served hot or cold, and the parmesan can be left out to make this a vegan dish! But don't be a vegan. 
If you're serving it hot, make sure you reheat it in the oven so that it stays crispy (don't serve it right out of the oven the first time, it really does need to cool--it's like chemistry!).
If you're serving it cold, make sure it's seriously room temperature (nootttttt warm) before you chill it in the fridge. 

Yum!

Until your time again finds mine,
Julia

So Many Clothes, So Little Space

Well I moved into my very first apartment last week! I'm an incoming junior now, and as an upperclassman I get to leave my dorm days behind me and move on to bigger and better things, like my AWESOME apartment. So, the living room carpet is this terrible burgundy color and the cabinets are too low to put the microwave on the counter, buttttttt the point is that now I have a living room! I have a kitchen! With cabinets! Not to mention, my walls are made of [whatever walls are made of...] and not cinderblock, which is totally a plus.
So now that I'm in this spacious dwelling there is a lot more room for my do dads. What I'm lacking, however, is armoire space. My closet is pretty large, but I only have 4 small drawers for my folded clothes, socks, underwear, ect. Not cool. Well, fear not for my excess clothing; I'm officially a carpenter! I'm sure the cynics would beg to differ, but anything with "Assembly Required" on the box is going to take some serious carpentry skill, which, it turns out, I have.
Here is the obnoxious space above my drawers:


I recognize it's for a TV, but a) it's for a huge clunky tv from the age of VCRs, and b) I don't have a TV. So the space must be otherwise utilized.
So I went to Target

I bought this 2 drawer chest thing that had the perfect dimensions to fit in this stupid nook. It holds my loungewear, bras, and underwear. In addition, I put a mirrored shadowbox on top:


Not only does it look wayyyy better, but I literally didn't have a place for the rest of my clothes, and now I do! The mirror is also conveniently my height so it's perfect for last minute self-checks!

Until your time again finds mine,
Julia


Friday, August 10, 2012

Salad of all Salads

Just to brag a little bit, I make a mean salad. My best salads, however, happen to be inspired by salads that somebody else made--I just basically make them better. One of my favorite salads has always been my own version of Tyler Florence's Arugula Salad and Ultimate Vinaigrette. Both are really delicious, and until recently I thought my "Tyler Florence Salad" was the only salad I could probably eat all the time and never get tired of it. That all changed when I was at Panera the other day and I had their Asian Sesame Chicken Salad. It's super delish and my first plan of action when I got home was to fiddle around in my pantry and make this salad--specifically, the dressing. Yes, I could have just looked up the recipe that I have provided in that handy dandy link, but that was all too easy; plus, I didn't even think of it!
Because I was just fooling around, I didn't pay much attention to measurements the first time around and I ended up making enough salad for 2 or 3 people. Has that ever stopped me before? I ate it all. But hey, it's salad, right? Healthy?


RECIPE (serves 2-3 people!):
4 c Lettuce of your choice (field greens, romaine, mixed cabbage..)
3/4 c Broccoli slaw
1/4 c Sliced almonds
1/4 c Crispy noodles
3 T Sesame seeds
1 1/2 T Sesame oil
1 T Rice vinegar
1 T Sweet chili sauce
1 t Cane sugar


In a large salad bowl, combine sesame seeds, sesame oil, rice vinegar, chili sauce, and sugar. Stir until one mixture. Add lettuce and broccoli slaw and toss until completely coated. Toss in almonds and noodles.
For decoration, you can set some noodles and almonds to the side to add to the top after serving.

This salad is light and totally yummy! It's a perfect mixture of sweet, salty, and tangy. Enjoy!

Until your time again finds mine,
Julia

Wednesday, August 1, 2012

Good Morning, Starshine


I had the most delicious breakfast smoothie this morning! I was really just experimenting, and I honestly don't think I've ever made my own smoothie before, but it turns out none of that matters when you have all the right ingredients. Even if you don't thing they're right at the time. What do I mean? I mean there's a doozy: cantaloupe.

INGREDIENTS:
3/4 cup frozen chopped (cubed, more or less) cantaloupe
1/2 cup sweetened vanilla almond milk
1 cup ice
2 T Greek yogurt

Serves two.

Put them all in a blender. Blend. Voila!


Until your time again finds mine,
Julia
An All Day, Every Day Sort of Thing

I LOVE AVOCADO.
This should just be established right off the bat. If you do not like avocado, I would first of all not recommend making this dish. Second of all, you're wrong and I would recommend that you check yourself.
AVOCADO IS THE BEST.
If you don't like Americanized guacamole, sushi in the form of California rolls, or Subway's Super-Food sandwiches, this does not mean you do not like avocado and I pity your limited awareness of its wonder.


These types of avocado, while still tolerable by an avocado lover such as myself, are not what makes avocado such a treat. These are mushy impostors which have probably been sitting out on the respective establishments' counters way too long. 

I eat avocado in many forms, but rarely will you find me enjoying an avocado pulverized to a consistency similar to pasty rice pudding. 

My mom makes a great avocado salsa, which consists of a variety of veggies like corn, onions, and bell peppers, and whole chunks of tasty avocado.
One of my favorite restaurants prepares a shockingly delectable avocado ice cream, topping it with paprika and a few pieces of popcorn.
Of all the avocado preparations in all the world, however, my favorite (at least for the time being) is the simple and easy avocado toast. One could argue that I would eat this four-ingredient meal all day, every day.


RECIPE:
2 Slices of your favorite hearty whole grain bread
1 Ripe (delicate in a hand's light squeeze) avocado
Manchego cheese, shaved or grated; enough to cover the surfaces of each slice of bread
2-3 t Kosher salt

Toast your bread. I like mine to border on medium-dark brown so that the crispness can support the weight of the toppings. Slightly dehydrated bread (simply from the toasting process) will also better contrast with the buttery moistness of the avocado.


Cut your avocado in half, remove the pit, and then use your knife to slice the avocado halves (within the skin) in a checkered pattern as seen below.


Prepare thin slices (or a small grated mound) of cheese. While my favorite to use for this dish is Manchego, feel free to use any firm cheese (I recommend a salty cheese like parmesan or white cheddar) of your choice. 


The first layer on your toast should be the cheese. Lay the slices or sprinkle your grated cheese in an even layer across each piece of toast.


Next, use a spoon to scoop out the chunks of avocado and "spread" (not smoosh) it on top of the cheese. Finally, sprinkle (to taste) the salt on top of each piece of toast.  I did not use all of the salt in this picture.


This dish takes about 5 minutes to prepare and, if you're me, about 2 seconds to eat. It is not only super quick and easy, but it keeps you full for hours and is absolutely delicious.

For a travel-capable version of this meal, simply put all of the avocado, cheese, and salt on one piece of toast and top with the other piece. Be prepared for your avocado to brown a little between the time you make the sandwich and the time you eat it, and know that it has nothing to do with the taste or sanitary value changing. If you're truly uncomfortable with the discoloration, you can submerge your avocado chunks in ice cold water before adding them to your sandwich. This will delay any browning for several hours.

If you looovvveee avocado like me, or if you've never had good avocado (I'm not kidding these are your only two options if I'm going to remain cordial), try this recipe! Fun, fast, and facile--what could be better?


Until your time again finds mine, 
Julia

Find Ten!

Everybody loves the sun. Sure, maybe we don't like to sweat, or get burned, and God forbid an ivory-skinned Snow White get one freckle, but no matter who you are and what your preferences may be, you have to love the sun. Even just to be in the shade on a sunny day. Even if you want to hate it, you have to love it. Well I do, and that's why every sunny day is a great day to take a break from reality and hit the pool (or beach, if I'm lucky enough).
Dr. Oz, the voice all legitimate medical professionals, says that it's beneficial to our health to bask in sunscreen-less-ly in the sun's rays for 10 minutes every day. Vitamin D is great for our bones, muscles (including heart health), it strengthens our immune systems, and it can even help prevent cancer! Ask Dr. Oz, not me. All I know is if he says it, it just must be true! 

Image from doctoroz.com.


Sure, you can take yet another pill with yet another concentrated dose of yet another vitamin, but it's like I said, you can't deny it, everybody loves the sun! So close your over-filled medicine cabinet and get outside! Find a park, pool, beach, or even just take a walk around your neighborhood for just ten minutes. It really doesn't get much easier--or more pleasant--than this. 
If you're getting your tan on like me and you plan to spend more than 10 minutes soaking in the sun, make sure you do apply a generous amount of sunscreen to your entire body. Don't forget your face, the backs of your hands, the tops of your feet, your lips, and your ears. These areas tend to be neglected during sunscreen application and more often than not fall victim to the sun's post-ten-minute wrath. Re-apply your wrath-retardant lotion or spray every time you get out of the water, and you should be good to go! 

Congrats on your boosted skeletal, muscular, and immune systems. Go you!


Until your time again finds mine, 
Julia