Wednesday, January 9, 2013

Forever 21

HAPPY BIRTHDAY TO THE BEST ROOMIE/BIFFLE/SOULMATE EVER!!!

Today is my girl Kelsey's 21st birthday FINALLY. I'm so excited. So I made her this cake. It's based on a scene from a premonition I had last night. Here we come.

Icing is butter/cream cheese icing with not enough yellow food coloring, and cake is dark chocolate fudge from a box, 'cause that's how I roll.
I rubbed a thin thin layer of icing on the mini bottle and on Barbie's bod to make the "confetti" stick.
To write with icing, just put your icing in one corner of a zip lock bag, tape up the corner to make it a little thicker, then cut off a teeny weeny point of the corner to make a hole. This is cheaper and more customizable than one of those piping tools that bakers use. Super easy and makes you look like you know what you're doing.

Until your time again finds mine,
Julia


Thursday, January 3, 2013

Que Syrah Syrah


It was only a matter of time before I fell in love with wine. Allow me to introduce you to wine jelly. My new go-to for big kid party contributions in my new big kid life. At least, that's how I look at it. In contrast to most of my other recipes, this is less inspired by another dish and really more of a copy. Like my sausage balls, however, I did not have the full recipe (but this time because America's Test Kitchen wants my money), so I had to figure it out. Pretty sure I did.

Ingredients:
One bottle of red wine, falling anywhere between crappy and vintage.
3 1/4 granulated sugar
Pectin powder (I think around 2 T, but sprinkle it in until a film forms between stirs)
3 T lemon juice
1 pat of butter


Pour about 1 cup of your wine into a small saucepan and reduce it (at a simmer/low boil) for 15-20 minutes. In a separate, larger pot, pour the rest of the wine and put it on medium-high heat. It needs to be warm enough to dissolve the sugar. Which is added next. Slowly add the sugar in increments and stir to make sure it is dissolving. After you've added all the sugar, pour in your lemon juice. Bring the wine mixture to a low boil and sprinkle in the pectin. The pectin will not dissolve (in fact it will form waxy clumps) unless the wine is boiling. Once it is dissolved, however, you can turn the eye down and add your pat of butter. This is to prevent a foamy layer from forming on the surface of the wine. If there is still foam build up, add a little more butter. There certainly isn't ever such a thing as too much butter. After you have reduced the heat, a film should form on the surface of the liquid, and there might even be a gel-like build up on the sides of the pot. Finally, stir in the reduced wine that has been simmering in the small saucepan. Remove the mixture from heat, and immediately pour into the container you plan to store your jelly in. Allow the jelly to refrigerate for 24 hours. Depending on the amount of pectin your "film" required, it could take only a few hours, and strangely enough warm jelly is kind of delicious.


Serving suggestion: 
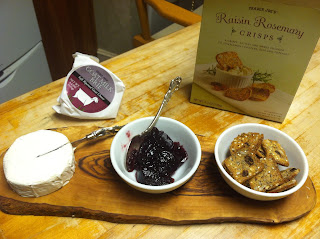
Serve with crackers (I like Rosemary & Olive Oil Triscuits or these awesome Raisin Rosemary Crisps I found at Trader Joes) and a stinky cheese. If you like bleu cheese, try that--or a creamy gorgonzola. I'm not a huge fan of bleus though, so I went with a goat cheese brie. I love goat cheese, and I think brie goes really well with wine, and I was lucky enough to find a combo cheese at Trader Joes. Delish. You probably won't even need dinner.

Until your time again finds mine,
Julia

But...What are Leftover Solo Cups?


So I was recently inspired by a pin. Typical, I know. Well I have an apartment for the first time in my life and as any avid pinner and future perfect housewife would be, I'm obsessed with new ways to decorate. I don't always follow through with my/Pinterest's ideas, but when I do.. man am I good. Anyway I was feeling patriotic after seeing the pin above, so I decided to try it myself. Who doesn't want the Fourth of July on their door all year round?!

Other than finding white solo cups, this craft was super fun and super easy!
All you need:
Red, white, and blue solo cups
Twine
A power drill. Or if your lame and not accident prone, a sharp knife. 
A paper clip
Enough patriotic ribbon to hang the wreath on your door

First, I just drilled a hole in the bottom of every cup.


You would not believe how gratifying it is to drill through a thin piece of plastic.
Next, I made a nifty little needle by reshaping a paper clip and weaving the twine through the loop I made at the top. Using the needle, I threaded the twine through every cup in the pattern red-white-red-white and a blue streak that is 1/3 the length of the red/white pattern, or 1/4 of the total length of the wreath. 

When you have strung all the cups together (number of cups will vary by the size of your door. I used about 35), space them into a loose stack lying on its side and then slowly work the stack into a circle. I had some trouble with this, but after a few minutes they all just snapped into place quite easily. 


I haven't hung it up yet because I'm not back at my apartment for another few days, but I can't wait! Perfect for college.. hope it doesn't get stolen!!

Until your time again finds mine,
Julia
Imitation is the Sincerest form of Flattery


Since my freshman year, I have been taking the occasional weekend vacay to my friend Caleb's house with a few of our other friends. He has seriously the best house ever, and accommodations aside, he also has the best family! I love them all, I really do, but if I had to pick my favorite thing about Caleb's house, it would have to be his mom's cooking. I could die. Everything she makes.....I can't even put words to how good it is. A couple things are so good that I may or may not dream about them on a weekly basis. So I decided to use my free time this winter break to make some of those fab items. Well I'll just tell you right now I failed miserably at making her biscuits. They are out of this world and I couldn't even make something that could compete with Bisquick. Not even something that could be a debatable failed attempt at making Bisquick biscuits. I'm not kidding. So I may or may not have given up on the whole biscuit thing. At least for now. I think I'll have to eat some more before I can try again... So the next trial was for her yummy yummy sausage balls. They are better than yours. Better than Pinterest's. The. Best. Ever. And I made them! Not as good, of course, but close--if I do say so myself.

Ingredients:
1 brick of Neese's Hot Sausage (trust me, use hot.)
1 bag of shredded sharp cheddar cheese
Bisquick (I know.)
>>It took me MANY trials to get this recipe right, so I'm not exactly sure how much Bisquick, but if you do the sausage and cheese first, add enough Bisquick to make a sticky dough consistency. Each of my batches tasted different (more bread-y, more sausage-y, more cheesy) but they were all good.
Optional: chili flakes, and any other spices if you're feelin' spicy.

I used a KitchenAid mixer and honestly I'm not sure if I could have made this without one. Sad truth.

Anyway, if you have a KitchenAid, or you are up for an arm workout, here's what you do.
Preheat oven to 375º.


Mix up the sausage by itself just to soften it out of its brick shape. Add the cheese. I added a sprinkle of chili flakes because I like my sausage balls a little hot! Then, simply roll the dough-like mixture into small balls, about 1 inch in diameter. Put them on a cookie sheet lined with parchment paper. This will help wick the grease away so that the balls can have a better texture and become crispy. If you have a Le Creuset baking dish, that will do the job even better, but it's about $40 more than parchment paper, so... your choice. Bake until golden brown and bubbly.


Immediately transfer them to a paper towel to absorb the final drips of grease. Make sure you eat them warm! So addictive. You'll see.

Until your time again finds mine, 
Julia

Omelette, Anyone?


I know it sounds crazy, but some schools have reallyyy good cafeteria food! My school has really good.... books. The DH, for dining hall, as we call it, has improved drastically since I arrived my freshman year, and wow does it still stink. Bad food or worse food, however, they have a mean breakfast squad. Moreover, they make the best omelettes. DH omelettes made me like omelettes! I always get egg whites with onion, bacon, and mozzarella. Ok, so their ingredients aren't of the widest variety. But that's why it's so fun to take recipes home! Only problem is, omelettes aren't exactly the easiest things to make. First of all, you need some badass teflon, and as a broke college kid, I simply don't have access to such luxuries. What I do have is a kind of okay teflon muffin tin. Let me tell you--not as random and useless as it sounds. May I introduce you to.........
THE MUFFIN TIN OMELETTE! 

You will need:
A pack of deli ham (you can use prosciutto or something nicer than deli ham, but like I said, broke.)
Diced onion (your favorite kind. Mine is yellow.)
Chopped chives (or scallions. They're tastier, but a little big for the muffin tin.)
Eggs
Shredded mozzarella cheese
Salt & pepper


Preheat the oven to 350º. 
Line your muffin tin with one slice of ham in each hole and then crack an egg into each "ham cup." Then, simply sprinkle your toppings (cheese, onion, and chives) into the cups/onto the egg. Pop 'em in the oven, and pull 'em out when the eggs are cooked to your liking! You can test their done-ness by jiggling the tin with an oven mitt or tongs. You definitely want the egg white part to be white, as opposed to translucent, but other than that, the choice is yours! As are the toppings, of course!


YUM! Happy breakfast!

Until your time again finds mine,
Julia