Wednesday, May 21, 2014

Small Packages

Hearty breakfasts now come in small packages stuffed into large boxes and lined up on shelves. Instant oatmeal, protein shakes, Cliff bars... They can keep you satisfied for hours. But I ask this of you: name the ingredients. 
Exactly. In my opinion, it's always better to make things yourself. When it comes to heartiness, however, that often means a bigger meal than the concentrated dosage of grub you find in those small packages. Well this morning I made myself a hearty breakfast with a surface area no larger than a coaster. It's a little strange-sounding, but trust me--it's worth the taste bud risk. 

RECIPE:
1 white cheddar Quaker rice cake (if you MUST be boring, go with "no salt" flavor.)
3 T peanut or other nut butter
1/2 banana, sliced

It's pretty self-explanatory: spread the PB over top the rice cake, place the sliced banana on top of that, and enjoy staying full till lunch!

Until your time again finds mine, 
Julia

Tuesday, May 20, 2014

Mi Cocina

I'm home! Not just home, but officially a college grad. I've spent the last seven days unpacking, and while I'm not yet finished with that project, I just had to find the time to get in the kitchen. I love coming home to cook for many reasons: higher quality utensils, bigger kitchen, my mom's credit card, and, of course, some time to experiment! I've been eating shrimp tacos for 3 of the past 5 nights, and for some reason that craving has not yet died down, so I decided to hit the kitchen and tackle it myself. One of my favorite places to eat is a Mexican "Street Food" restaurant and bar where I also coincidentally work. My favorite dish? Not the shrimp tacos, but close--the fish tacos. My restaurant uses tilapia, which is an extremely mild, flaky, and fresh-tasting white fish. So as to not go overboard with the whole shrimp thing, I bought tilapia and attempted the fish taco. I surprised myself yet again--it worked! These things were delish:


RECIPE (serves 2):

1 filet of tilapia (or your choice of another fish)
Soft tortillas (I used whole grain. You can also substitute tortillas for bibb lettuce.)
1/4 c Panko
1/4 c Grape Nuts (I used Publix generic brand)
1 egg
Salt, pepper, and cayenne pepper
2-3 T coconut oil
1/4 c salsa
1 c shredded cabbage or cole slaw bag kit
1 t sriracha
1 t dijon mustard
1 t mayonnaise
1/4 t (a pinch) wasabi powder
1/4 t (a pinch) sugar (I used Truvia)
1 t soy sauce
1 t rice vinegar
1/2 t sesame seed oil
***this is a lot of ingredients! I was just messing around when I made the slaw (everything listed after shredded cabbage). You can toss the cabbage in any store-bought dressing--it doesn't even have to be Asian-inspired like mine! The dressing recipe for my Asian Sesame Chicken Salad would work great, too!

Cut the fish into "chicken tender"-sized pieces; season them with salt, pepper, cayenne, and any other seasoning that suits your fancy. I used very little seasoning. In a small bowl, use a fork to beat your egg into a consistent yellow liquid. On a plate, blend the Panko and cereal and make a flattened but loose pile of the mixture. You can also season this mixture. On medium-high heat, melt 1 T of the coconut oil in a medium-sized, nonstick pan. A layer of liquid oil should thinly coat the bottom of the pan; add more coconut oil as needed. Prepare your assembly line hands! Coat each piece of fish in egg, then breading, then place on the pan of hot oil. Cook 2-3 minutes per side, and remove. I do not think the fish needs to be hot for a fish taco--in fact I prefer that it not be--which is why I cook the fish first. If you would rather it be fresh off the stove, prepare the fish last.


In a medium bowl, combine cabbage/slaw, sriracha, mustard, mayo, wasabi, sweetener, soy sauce, vinegar, and sesame oil. toss until cabbage/slaw is evenly coated. There may be extra liquid at the bottom. This makes a great decorative and tasty drizzle.


I removed the excess oil from my pan and used the warm pan to heat my tortillas one at a time. I also cut my warmed tortillas in half, as whole grain tortillas tend to be larger than the small flour or corn tortillas you can buy. Spoon a layer of slaw onto the center of the tortilla. On top of the slaw, place your fish, and then top with salsa. Fold the tortilla, and you have your fish taco! Because of the weird shape of a half-tortilla, mine are kind of folded like burritos. Don't forget your drizzle!

This is a fun way to achieve restaurant-style fish tacos right in your own kitchen. Because of the breading, frying oil, and shell choices, this is also a lighter variety of the typical fried-fish taco.

I'm so glad to be home!
Until your time again finds mine,
Julia

Saturday, May 11, 2013

Orange You Glad I Didn't Say "Green?"

I've always told people I'm not a fan of bell peppers. First of all, I really just don't like the flavor, but I also don't like America's obsession with "roasted red peppers." Yes, they have the bell pepper taste I don't particularly enjoy, but they almost always come on things that would be 100% better if by "roasted red peppers" they meant "sun dried tomatoes." I can't tell you how many times I've been out to eat with people and the ordering process goes something like this:
Friend: "What are you getting? I can't decide. Oh, this looks good."
Me: "Yeah, I saw that too; that does look good. I just really don't like roasted red peppers. I wish they were sun dried tomatoes instead."
Friend: "Oh! They're not? I literally read that and saw sun dried tomatoes anyway. That's what I thought I'd be getting. Oh well. It should be good anyway."

Because, you see, people like bell peppers. So to them, it's not the end of the world when a tomato is really a pepper. That being said, dear restaurants: why not just use tomatoes?!

Anyway, that was a good rant, but the point is that I may be weird in not liking bell peppers, but I know I'm not weird in specifically not liking GREEN bell peppers. They DO have a distinct taste and I know plenty of people like them, but plenty of people don't! Hence the origin of my title. I have discovered that I like, wait for it, orange bell peppers! Isn't that crazy? I know, some people thing they all, even the green ones, taste the same, but I beg to differ and I think they're all gross except for the orange ones. And probably the yellow ones since I'm pretty sure they're the same thing, just different shades of orangey yellow.
So, the other night I was feeling like an "I swear, I'm not anorexic" vegetarian (you know the type) because it was 9:30, I hadn't eaten dinner, knew I needed to, wasn't hungry, and hadn't had a fruit or vegetable in approximately 4 days. So, per usual, I rummaged, and found an orange bell pepper. That's ALL I found or I wouldn't have even gone where I'm about to go. I said to myself, "ok, I can handle this. All I need is some ranch--a LOT of ranch--and I won't even care about the bell pepper." Well, there was no ranch. Only Asian sesame vinaigrette and Caesar. ASV wasn't going to be potent enough so I went with the Caesar. Like always, a pretty plate is always going to taste better than an ugly mess, so I prepared the bell pepper by slicing it into narrow pieces, lining them up on a long rectangular plate, and then I drizzled Caesar and olive oil on top. I also sprinkled on some cracked pepper and some chili flakes.
To my surprise, it was delicious, and if I didn't love bacon so much, I might have become an "I swear I'm not anorexic" vegetarian that night. Oh well. Maybe I'll sprinkle bacon on top next time. Win win.


Until your time again finds mine,
Julia

Tuesday, April 30, 2013

Friday, March 8, 2013

Sometimes, When I Get Nervous...I make a casserole.

SPRING BREAK 2013!!!! And I'm making casseroles. Why hasn't anyone called Girls Gone Wild yet?
This week is spring break and I just decided to come home and spend time with my family (slash hang out with my recently acquired FUTURE HUSBAND but shhhh he doesn't know yet). Everyone (my mom) in Charlotte, however, either has a job (my mom)(and MY FUTURE HUSBAND), a boyfriend (my mom), or goes to bed really early (my mom. and my grandmother), so I found myself coming home from my favorite cafe at around 9:30 feeling terribly bored and lonely. I really like having the house to myself, obvi, but last night my brain was just not having it, so I detoured to the grocery store to get some ingredients for my typical lonely girl fix: the casserole. I know, casseroles are for second-time bachelors, post-ICU patients, and the women of the fifties, but what do they all have in common? These people are the pitied, and by golly if I wasn't throwing a little pity party myself. So, casserole it was. I rallied up the fixins and I was outta there. My oven was preheated in no time, and I was soon-to-be lonely no more.

Ingredients:
Assorted veggies. I bought one bag of assorted baby carrots, broccoli, and cauliflower and one bag of Brussels sprouts. It totaled 3-4 cups.
1 yellow onion
3 cloves of garlic
1/2 to 1 cup sun dried tomatoes, depending on how much you like them and how many you can get your hands on. I like the dry ones that come in a bag, not the ones stored in oil.
1/2 cup shredded mozzarella cheese
Olive oil, Lawry's seasoning salt, cayenne pepper, chili flakes, and freshly ground pepper

Preheat the oven to 375. Slice your veggies so they all have a flat side. I'll cut my cauliflower and broccoli into thirds and my carrots and Brussels sprouts in halves. Toss them in enough olive oil so they are thinly but evenly coated, add some of your spices to taste, and pop em in the oven on a cookie sheet. Stir occasionally.
While those are sizzlin, heat up a pan on medium with some olive oil and chop up your onion and garlic. Put the onion and garlic in the hot pan with about a teaspoon of Lawry's and any other spices you'd like. You really just want the garlic to be cooked; you're not trying to caramelize the onions. Remove from heat.
Take out your veggies when the edges are brown or even slightly (ever so slightly) blackened.
On the cookie sheet, mix in your onion concoction and your tomatoes. Let the mixture cool just to the point that you can touch the food without having to throw it down screaming. Mix in about 2/3 of your cheese. That's 1/3 a cup I think. Pour it all into a casserole dish and top with the rest of your cheese and a drizzle of olive oil. Using your finger, push any protruding sun dried tomatoes to just below the surface of the cheese. Sun dried tomatoes tend to burn in the direct exposure to the heat.
Everything is cooked, so baking is only a matter of the cheese melting and the top crisping. Just check on it and take it out when it looks good, kinda like my picture below! (Though this is actually of the next day, heated up in a smaller dish.)

Casseroles are your friend; pitied you are not!

Until your time again finds mine,
Julia

Wednesday, January 9, 2013

Forever 21

HAPPY BIRTHDAY TO THE BEST ROOMIE/BIFFLE/SOULMATE EVER!!!

Today is my girl Kelsey's 21st birthday FINALLY. I'm so excited. So I made her this cake. It's based on a scene from a premonition I had last night. Here we come.

Icing is butter/cream cheese icing with not enough yellow food coloring, and cake is dark chocolate fudge from a box, 'cause that's how I roll.
I rubbed a thin thin layer of icing on the mini bottle and on Barbie's bod to make the "confetti" stick.
To write with icing, just put your icing in one corner of a zip lock bag, tape up the corner to make it a little thicker, then cut off a teeny weeny point of the corner to make a hole. This is cheaper and more customizable than one of those piping tools that bakers use. Super easy and makes you look like you know what you're doing.

Until your time again finds mine,
Julia


Thursday, January 3, 2013

Que Syrah Syrah


It was only a matter of time before I fell in love with wine. Allow me to introduce you to wine jelly. My new go-to for big kid party contributions in my new big kid life. At least, that's how I look at it. In contrast to most of my other recipes, this is less inspired by another dish and really more of a copy. Like my sausage balls, however, I did not have the full recipe (but this time because America's Test Kitchen wants my money), so I had to figure it out. Pretty sure I did.

Ingredients:
One bottle of red wine, falling anywhere between crappy and vintage.
3 1/4 granulated sugar
Pectin powder (I think around 2 T, but sprinkle it in until a film forms between stirs)
3 T lemon juice
1 pat of butter


Pour about 1 cup of your wine into a small saucepan and reduce it (at a simmer/low boil) for 15-20 minutes. In a separate, larger pot, pour the rest of the wine and put it on medium-high heat. It needs to be warm enough to dissolve the sugar. Which is added next. Slowly add the sugar in increments and stir to make sure it is dissolving. After you've added all the sugar, pour in your lemon juice. Bring the wine mixture to a low boil and sprinkle in the pectin. The pectin will not dissolve (in fact it will form waxy clumps) unless the wine is boiling. Once it is dissolved, however, you can turn the eye down and add your pat of butter. This is to prevent a foamy layer from forming on the surface of the wine. If there is still foam build up, add a little more butter. There certainly isn't ever such a thing as too much butter. After you have reduced the heat, a film should form on the surface of the liquid, and there might even be a gel-like build up on the sides of the pot. Finally, stir in the reduced wine that has been simmering in the small saucepan. Remove the mixture from heat, and immediately pour into the container you plan to store your jelly in. Allow the jelly to refrigerate for 24 hours. Depending on the amount of pectin your "film" required, it could take only a few hours, and strangely enough warm jelly is kind of delicious.


Serving suggestion: 
Serve with crackers (I like Rosemary & Olive Oil Triscuits or these awesome Raisin Rosemary Crisps I found at Trader Joes) and a stinky cheese. If you like bleu cheese, try that--or a creamy gorgonzola. I'm not a huge fan of bleus though, so I went with a goat cheese brie. I love goat cheese, and I think brie goes really well with wine, and I was lucky enough to find a combo cheese at Trader Joes. Delish. You probably won't even need dinner.

Until your time again finds mine,
Julia

But...What are Leftover Solo Cups?


So I was recently inspired by a pin. Typical, I know. Well I have an apartment for the first time in my life and as any avid pinner and future perfect housewife would be, I'm obsessed with new ways to decorate. I don't always follow through with my/Pinterest's ideas, but when I do.. man am I good. Anyway I was feeling patriotic after seeing the pin above, so I decided to try it myself. Who doesn't want the Fourth of July on their door all year round?!

Other than finding white solo cups, this craft was super fun and super easy!
All you need:
Red, white, and blue solo cups
Twine
A power drill. Or if your lame and not accident prone, a sharp knife. 
A paper clip
Enough patriotic ribbon to hang the wreath on your door

First, I just drilled a hole in the bottom of every cup.


You would not believe how gratifying it is to drill through a thin piece of plastic.
Next, I made a nifty little needle by reshaping a paper clip and weaving the twine through the loop I made at the top. Using the needle, I threaded the twine through every cup in the pattern red-white-red-white and a blue streak that is 1/3 the length of the red/white pattern, or 1/4 of the total length of the wreath. 

When you have strung all the cups together (number of cups will vary by the size of your door. I used about 35), space them into a loose stack lying on its side and then slowly work the stack into a circle. I had some trouble with this, but after a few minutes they all just snapped into place quite easily. 


I haven't hung it up yet because I'm not back at my apartment for another few days, but I can't wait! Perfect for college.. hope it doesn't get stolen!!

Until your time again finds mine,
Julia

Imitation is the Sincerest form of Flattery


Since my freshman year, I have been taking the occasional weekend vacay to my friend Caleb's house with a few of our other friends. He has seriously the best house ever, and accommodations aside, he also has the best family! I love them all, I really do, but if I had to pick my favorite thing about Caleb's house, it would have to be his mom's cooking. I could die. Everything she makes.....I can't even put words to how good it is. A couple things are so good that I may or may not dream about them on a weekly basis. So I decided to use my free time this winter break to make some of those fab items. Well I'll just tell you right now I failed miserably at making her biscuits. They are out of this world and I couldn't even make something that could compete with Bisquick. Not even something that could be a debatable failed attempt at making Bisquick biscuits. I'm not kidding. So I may or may not have given up on the whole biscuit thing. At least for now. I think I'll have to eat some more before I can try again... So the next trial was for her yummy yummy sausage balls. They are better than yours. Better than Pinterest's. The. Best. Ever. And I made them! Not as good, of course, but close--if I do say so myself.

Ingredients:
1 brick of Neese's Hot Sausage (trust me, use hot.)
1 bag of shredded sharp cheddar cheese
Bisquick (I know.)
>>It took me MANY trials to get this recipe right, so I'm not exactly sure how much Bisquick, but if you do the sausage and cheese first, add enough Bisquick to make a sticky dough consistency. Each of my batches tasted different (more bread-y, more sausage-y, more cheesy) but they were all good.
Optional: chili flakes, and any other spices if you're feelin' spicy.

I used a KitchenAid mixer and honestly I'm not sure if I could have made this without one. Sad truth.

Anyway, if you have a KitchenAid, or you are up for an arm workout, here's what you do.
Preheat oven to 375ยบ.


Mix up the sausage by itself just to soften it out of its brick shape. Add the cheese. I added a sprinkle of chili flakes because I like my sausage balls a little hot! Then, simply roll the dough-like mixture into small balls, about 1 inch in diameter. Put them on a cookie sheet lined with parchment paper. This will help wick the grease away so that the balls can have a better texture and become crispy. If you have a Le Creuset baking dish, that will do the job even better, but it's about $40 more than parchment paper, so... your choice. Bake until golden brown and bubbly.


Immediately transfer them to a paper towel to absorb the final drips of grease. Make sure you eat them warm! So addictive. You'll see.

Until your time again finds mine, 
Julia

Omelette, Anyone?


I know it sounds crazy, but some schools have reallyyy good cafeteria food! My school has really good.... books. The DH, for dining hall, as we call it, has improved drastically since I arrived my freshman year, and wow does it still stink. Bad food or worse food, however, they have a mean breakfast squad. Moreover, they make the best omelettes. DH omelettes made me like omelettes! I always get egg whites with onion, bacon, and mozzarella. Ok, so their ingredients aren't of the widest variety. But that's why it's so fun to take recipes home! Only problem is, omelettes aren't exactly the easiest things to make. First of all, you need some badass teflon, and as a broke college kid, I simply don't have access to such luxuries. What I do have is a kind of okay teflon muffin tin. Let me tell you--not as random and useless as it sounds. May I introduce you to.........
THE MUFFIN TIN OMELETTE! 

You will need:
A pack of deli ham (you can use prosciutto or something nicer than deli ham, but like I said, broke.)
Diced onion (your favorite kind. Mine is yellow.)
Chopped chives (or scallions. They're tastier, but a little big for the muffin tin.)
Eggs
Shredded mozzarella cheese
Salt & pepper


Preheat the oven to 350ยบ. 
Line your muffin tin with one slice of ham in each hole and then crack an egg into each "ham cup." Then, simply sprinkle your toppings (cheese, onion, and chives) into the cups/onto the egg. Pop 'em in the oven, and pull 'em out when the eggs are cooked to your liking! You can test their done-ness by jiggling the tin with an oven mitt or tongs. You definitely want the egg white part to be white, as opposed to translucent, but other than that, the choice is yours! As are the toppings, of course!


YUM! Happy breakfast!

Until your time again finds mine,
Julia


Thursday, December 6, 2012

Beggars can't be choosers, but they can make something out of nothing


Here at Furman, students have free, unlimited printing at the library. Because of this wonderful feature of my campus, I do not have a printer. Because I do not have a printer, I do not have the luxury of color printing. In trying to print out pictures to frame for my apartment, I found myself in a sticky dilemma. Pay money for quality, color pictures, or be cheap and look it by hanging grainy, black and white pictures printed on thin letter paper.
Needless to say, I went with the latter.
And it looks awesome!
I chose pictures that, based on the lighting of the photos, would look like the black and white was an artistic effect, not a low-def byproduct of our printers' inability to print anything outside the confines of Times New Roman. Anyway it worked, and now my apartment looks classier than anything the crazy expensive printing center down the road could have provided.
So basically all I did was mess with the settings on the computer to make sure the images came out the right size (I had 3x5 brushed silver frames from Walmart), and I made sure to buy frames that looked pretty simple and nice so as to polish off the illusion that these were quality photo prints. It turns out pictures look a lot nicer behind glass and framed.
Here's the creative catch (if the previously said wasn't quite creative enough for you): I printed images to represent each roommate's hometown! There are three of us, and we are each conveniently from different cities. Each of our cities are also conveniently included in the portfolio of a certain photographer whose name I cannot remember for the life of me. One day I will figure it out and put a link, but until then I did not take nor do I own the rights to these photos. But thanks to whomever took them. Because they're fantastic!
So I framed them, and then I wrote the name of each city on the glass for a nice effect. And Voila!


Until your time again finds mine,
Julia

Decorating the Apartment...Three Months Later than Anticipated

Pinterest is the best thing ever, and we either all agree on that, or the ones who don't are bitter and ignorant fools who probably just never got their acceptance emails. Sorry bout it.
So of course it is from the magical site of Pinterest that I found these ideas for some apartment wall art! Hope you likey!

Shit Could Be Worse.
Don't chase anything but dreams and drinks

Keep it Simple

Until your time again finds mine,
Julia

We should win something for this.

During our roomie bonding sesh, Lindsey and I did THIS to our fridge. Right?!?


Waking up to this in the morning will make being sick soooo much better. 'Cause right now I'm not feeling too hot. Boo.


Until your time again finds mine,
Julia

Watch Out, Papa John's


It's exam week and life sucks. Not to mention I've been sick for the past few days, so while finals are looming over my poor congested head, little work has been accomplished. In light of this non-working pattern, my roomie Lindsey and I decided to have an dinner together. Which of course meant ordering a large half cheese, half pepperoni pizza with extra garlic sauce and extra pepperoncinis. Delish. Well we ran out of money, so we practiced restraint and did not order cinnasticks. IT WAS PAINFUL. Halfway through dinner, however, a lightbulb went off.
And thus the crescinnamon roll was born. Papa John's now has some serious competition in the dessert department.

RECIPE:
1 can of Pillsbury (or any brand) Crescent Rolls
1 quarter stick of butter (I know that equals a certain number of tablespoons, but I know you're going to cut from the stick anyway, so I really don't think it matters)
1 1/2 t ground cinnamon
1 1/2 t sugar


Preheat the oven to 350. I don't care what the directions say. Cut your butter eight slices, and then cut each slice in to two rectangular halves. Place one half at the widest part of the unfolded crescent roll, and the second half about a third of the way down. Blend sugar and cinnamon in a bowl. Using a spoon, sprinkle the mixture onto the entire surface of the unfolded crescent roll. Roll the crescents as you would normally.
Pop em in the oven and bake until the white begins to turn gold. Not a golden brown, gold. They will look underdone. They are not. Take them out and be careful not to burn your tongue because they have a tendency to jump into your mouth without warning. And suddenly they are gone. All of them.

Enjoy!


Until your time again finds mine,
Julia

Tuesday, September 25, 2012

I Reward Myself With Food.

Every time I finish a flash card, I get a Cheez It. Everybody wins!

Friday, September 14, 2012

Sour Power


SOUR PATCH KIDS ARE SO GOOD. You agree. Let's just all agree. They're delish.
Well.
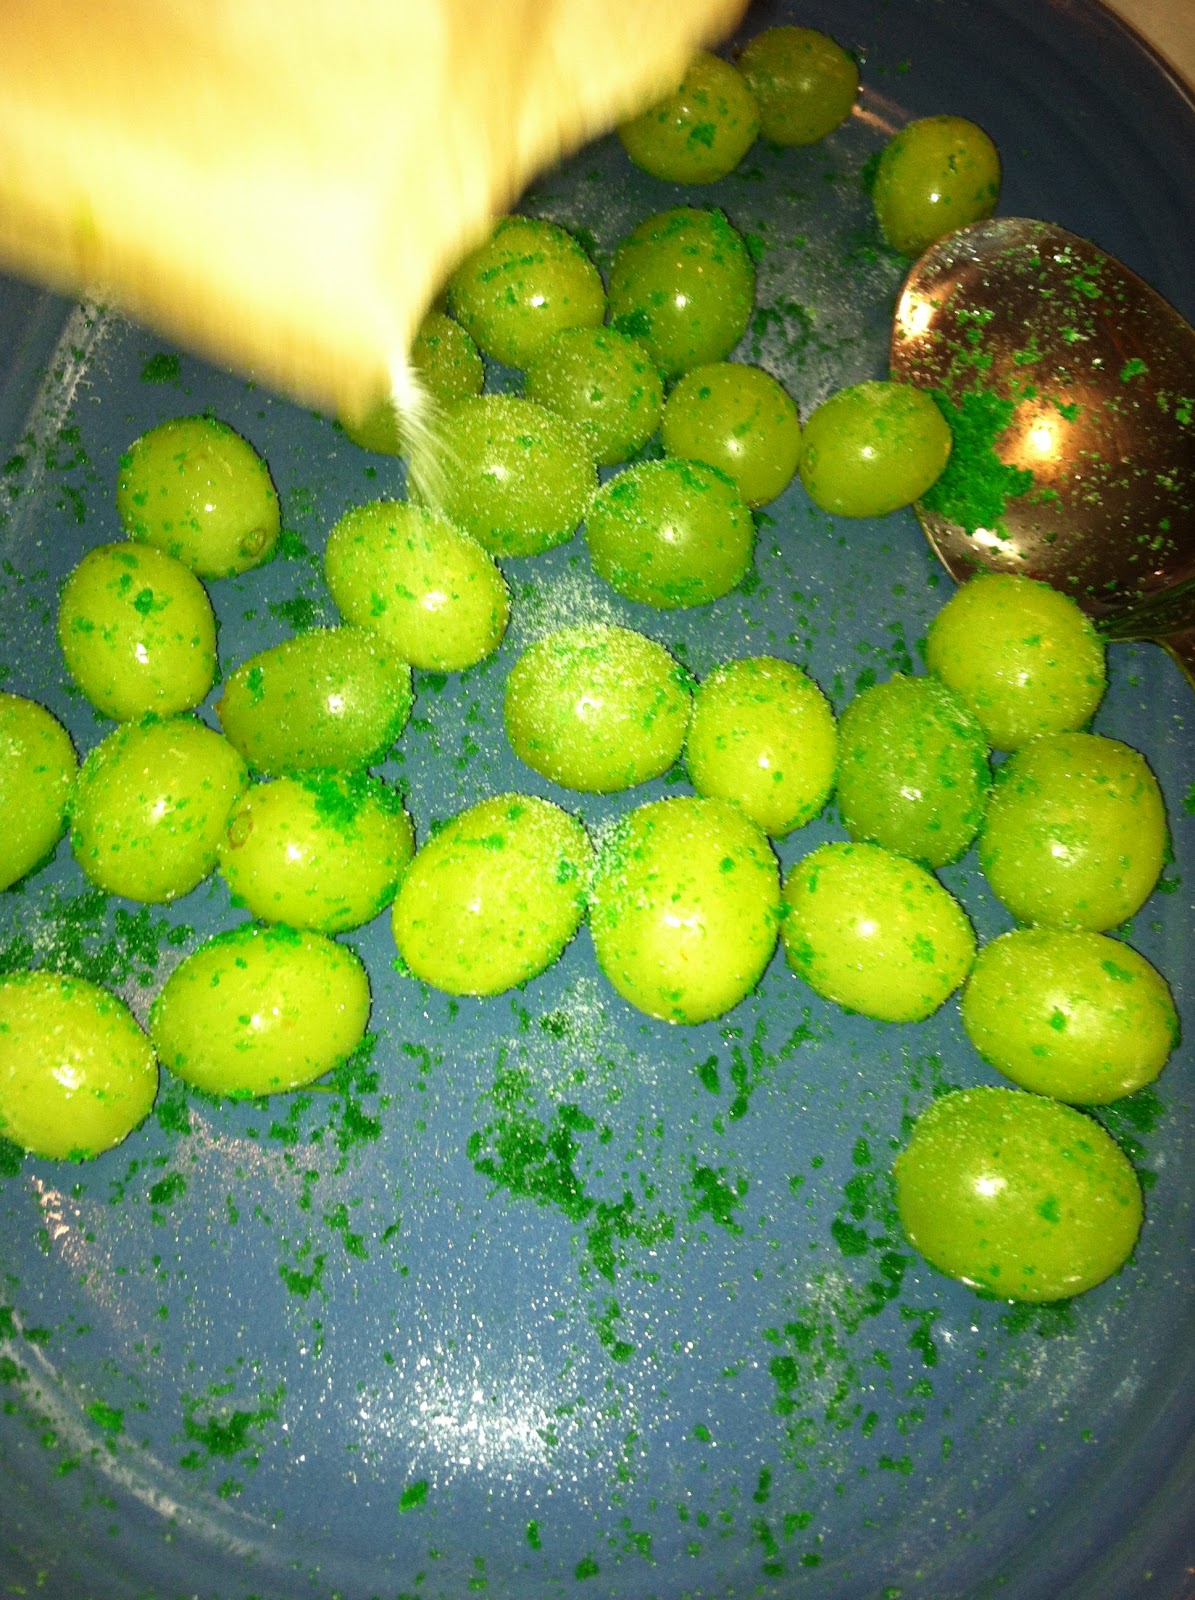
SO ARE FROZEN GRAPES especially on a hot summer day? Yeah. If you haven't tried, do. There's seriously nothing more refreshing than chewing on a frozen grape in August heat. It's September, so yes, this tip is a little late, but whatever. September gets hot too.
Anyway, I promise I'm not having an ADD spell, there is a point:
HAVE BOTH. AT THE SAME TIME.
Here we go. So simple.
I call them "Frozen Sour Patch Grapes." So clever, I know.


Wash green grapes in a colander. 


Roll the STILL WET (so the powder sticks) grapes in Jello powder of your choice. A matching color is recommended. I chose lime, not only for its color but for its tartness. 
Freeze.
Serve.
Actually enjoy 100ยบ weather.

Until your time again finds mine,
Julia


Wednesday, August 29, 2012

Comfort Food Redefined

I recently lost a dear relative with whom I was very close. Unfortunately, I was at school away from my family when I heard the news. That day, last Friday, was unbearable. I had the support of my friends who knew of my family's loss, but I really just wanted to be at home with my mom. That was not possible until the next day, so one of my wonderful friends devised a plan to brighten the day even a little.
I went to his apartment for a hug, and instead (or in addition, really), he took me to the grocery store and told me to get anything I wanted. While my reluctance to spend his money on myself was evident, I have to admit it didn't take long for me to get into the groove, grabbing ingredients from every aisle.
Twenty-five minutes and several weekly allowances later, we were ready to head back to the kitchen, as I was going to make my version of comfort food.
The plan: Thyme pasta and sugar snap peas, the former being my favorite pasta, the latter a form of homesickness, as one of my mom's specialties is sugar snap peas.


RECIPE: (serves 3, or 2 with leftovers!)
1/2 box pasta of your choice. I used Farfalle.
1 medium yellow onion, diced
10-15 sprigs of fresh thyme
3 T olive oil
3 t rock salt
4 t ground pepper
4 cloves of garlic, minced
1 1/2 c sugar snap peas
3 T reduced balsamic ("Balsamic Glaze" in stores)

Remove the thyme leaves from the stalks by gently pinching the top of the stalk and gliding it down, against the natural growth of the leaves. Chop the leaves finely.


Heat 1 T olive oil in a medium nonstick pan at medium heat. Add onion, 1 t salt, 2 t pepper, and garlic and raise the heat to a medium-high level. Cook at medium heat, stirring occasionally.
Boil water in a large pot for the pasta. When steam rises from the water, add 1 t salt and a splash of olive oil.
When the onions begin to look translucent, add the chopped thyme. Continue to stir occasionally, and change the heat to low. They can remain like this until serving time.
In a medium pan, heat 1 T olive oil at medium heat. Add the sugar snap peas and stir until they are fully coated in the oil. Add 1 t salt, 2 t pepper, and around 1 T of the balsamic and stir. Continue to stir often, adding balsamic as you go.


When the water is boiling, add the pasta and cook to your liking and according to the directions on the box. I prefer my pasta al dente (firmer), so I always take off a couple minutes from the directions.
Continue to cook the sugar snap peas until they begin to brown. Switch the heat to low. The peas can remain like this until serving time.
When the pasta is ready, strain it and add it back to the pot with 1 T olive oil and stir. Add in the onion mixture.
Serve and feel comforted--I know I did!

In Loving Memory
Grandmommy Anne


Until your time again finds mine, 
Julia

Sunday, August 19, 2012

"Pot Luck"

My grandfather turned the big eight-oh this summer! I'm pretty obsessed with my grandfather, so this event in itself was a pretty big deal to me, but what was even more great was that my grandmother decided to hold a huge party/family gathering in his honor. Second to my grandfather, I'm obsessed with my whole family. I need to see everyone as often as possible, and I experience concerning withdrawals when I leave them for school or vacation.
I consider my family (my mom's side) to consist of about 50 people. I don't have any cousins, but I have plenty of those second, third, twice removed mumbo jumbo and we all interact as though we are directly related. Everyone is either my aunt, uncle, or cousin. I even have a great aunt that I, along with everyone else in the entire family, call "Grandmommy." So yeah, we're tight.
Anyway, this party had me super excited because EVERYONE was coming, and since we all live in different places around the country, it's not very often that we're all together again.
The family had the whole week together, and then the party was on Saturday. My grandmother worked really really hard on everything for this party, and one of her fantastic ideas to lessen her terribly heavy load was to ask each person to bring their favorite salad, dip, or finger food. I WAS PSYCHED. A chance to mess around in the kitchen?!?!?! Yes, please!


Though I definitely had Pinterest recipes on the brain, I was basically making this up as I went along. And I can promise you you can too. You need a flavor theme (sweet, salty, savory...) and something crunchy and crushable (breadcrumbs, corn flakes, potato sticks...). But a lot of people hate that kind of direction, so yayyy I made a non-ambiguous recipe.

RECIPE:
1 strained can of chickpeas
1 thawed bag of frozen, shelled edamame
Mixture of:
     3 T crushed/ground potato sticks
     2 t garlic chips
     2 T powdered Parmesan cheese
     1 t kosher salt
     1 t coarsely ground pepper
     1/2 to 1 1/2 t chili flakes
2 T olive oil
2 t sesame oil


*Prepare the chickpeas and edamame separately.
Preheat your oven to 400. 
Toss chickpeas in half of the olive oil (1 T) and half of the sesame oil (1 t). It doesn't need to be exact. 
Toss the edamame in the rest of the olive oil and sesame oil. 
Spread the edamame and chickpeas on 2 separate cookie sheets large enough to make one layer. 
Sprinkle enough of the dry mixture over the edamame & chickpeas to thinly coat them. Using a spoon, "stir" (really just shift/roll them around so that they pick up the excess dry mixture and their un-sprinkled sides become exposed) the edamame and chickpeas, making sure they remain in one layer (no piles or mounds). Continue to sprinkle and "stir" until they are completely covered (as if they are being battered for a fry). If there is excess, you can save it and sprinkle it on top at the end as a garnish, but don't feel left out if there isn't any. I'm just trying to make the stingy people feel better. 
Place the cookie sheets in the oven. The chickpeas will take between 10 and 15 minutes to get crispy. The edamame will take 30 to 40 minutes. 
When both are crispy, remove and let cool (still on the cookie sheets). 
Combine in a large bowl & mix gently.


This dish can be served hot or cold, and the parmesan can be left out to make this a vegan dish! But don't be a vegan. 
If you're serving it hot, make sure you reheat it in the oven so that it stays crispy (don't serve it right out of the oven the first time, it really does need to cool--it's like chemistry!).
If you're serving it cold, make sure it's seriously room temperature (nootttttt warm) before you chill it in the fridge. 

Yum!

Until your time again finds mine,
Julia